
Basic Leather Craft Techniques

Basic Leather Craft Techniques for Beginners: Essential Skills and Tools to Start Leatherworking
Leatherworking is the hands-on process of cutting, shaping, joining and finishing animal hides to create durable, useful—and often beautiful—items. Learn a handful of reliable core techniques and you’ll be able to make clean, long-lasting pieces from your first projects. This guide walks through the fundamentals—cutting, hand stitching, edge finishing, dyeing and basic carving—explaining how each technique works, why it matters and which simple projects build those skills fastest. You’ll get practical explanations of saddle stitching and skiving, see how beveling and burnishing produce professional seams, and learn how leather type affects tooling and longevity. We also map the essential tools for cutting, stitching and finishing, and suggest starter projects that reinforce each skill step by step. Along the way we highlight material choices (vegetable, chrome, oil-tanned) and basic safety and maintenance tips so you can pick the right leather and tools for your first builds. By the end you’ll have a clear practice plan: which skills to learn first, which tools to buy or borrow, and which small projects give the most learning value.
This guide is for both makers and buyers. It explains craft techniques while also showing how those skills scale into production-quality work—useful if you’re sourcing materials or placing custom orders. Pakistan Leather appears here as a manufacturer and exporter offering artisan hand-stitched quality, custom production options, a range of leather types, and Pantone-based color development for one-off or bulk orders. If you’d like samples or bespoke runs, Pakistan Leather welcomes inquiries through its published contact channels for product browsing and custom quotes. The remainder of this guide focuses on techniques and tool choices first, using manufacturer-grade examples only to show how craft skills translate to production-ready results.
What Are the Basic Leatherworking Techniques Every Beginner Should Know?
Basic leatherworking techniques are the foundation that turns raw hides into joined, finished goods—each technique delivers a specific functional or visual outcome. Cutting creates accurately sized panels; stitching joins parts for strength; edge finishing improves durability and comfort; dyeing and painting add color and protection; and skiving and carving reduce bulk and refine profiles. Learning these techniques in a logical sequence reduces mistakes and shortens your learning curve, since measurement, cutting and edge prep determine how well stitching and finishing turn out. Below is a concise rundown of the core techniques and the immediate benefits they deliver—useful for quick reference as you practice.
Core leatherworking techniques every beginner should know:
- Cutting: Use a sharp knife and a straightedge for precise panels, tighter seams and less wasted material.
- Hand Stitching (Saddle Stitch): The two-needle saddle stitch creates redundant, long-lasting seams ideal for high-stress areas.
- Edge Finishing (Beveling & Burnishing): Removes bulk and polishes edges so pieces feel finished and resist fraying.
- Dyeing and Painting: Adds consistent color while protecting the surface from wear.
- Skiving and Thinning: Thins seam allowances to avoid bulky joins and enable smooth folding.
Understanding these basics prepares you for the next steps: choosing the right tools and practicing short projects that isolate each skill.
How Does Hand Stitching Leather Work? Key Methods Like Saddle Stitch Explained
Hand stitching—especially saddle stitch—is a two-needle method where two threads cross through each hole, creating redundancy and exceptional tensile strength compared with single-thread lockstitches. That redundancy means if one thread wears, the opposite thread still holds the seam, making saddle stitch the go-to for wallets, straps and other stress-bearing items. Essential tools include a pricking iron or stitching awl for hole spacing, two blunt saddle needles, waxed thread matched to leather thickness, and a stitching pony or clamp to stabilize the work. Common beginner errors are uneven hole spacing, inconsistent tension and skipping back-tucks at the ends; practicing on scrap leather builds reliable rhythm and consistent tension. Learn saddle stitch early and you reduce the chance of seam failure and move toward production-quality, hand-stitched results.
These stitching mechanics influence choices in thread size and hole spacing—so the next practical area is accurate cutting and edge finishing, which let hand stitches sit cleanly and hold well.
What Are the Essential Leather Cutting and Edge Finishing Techniques?
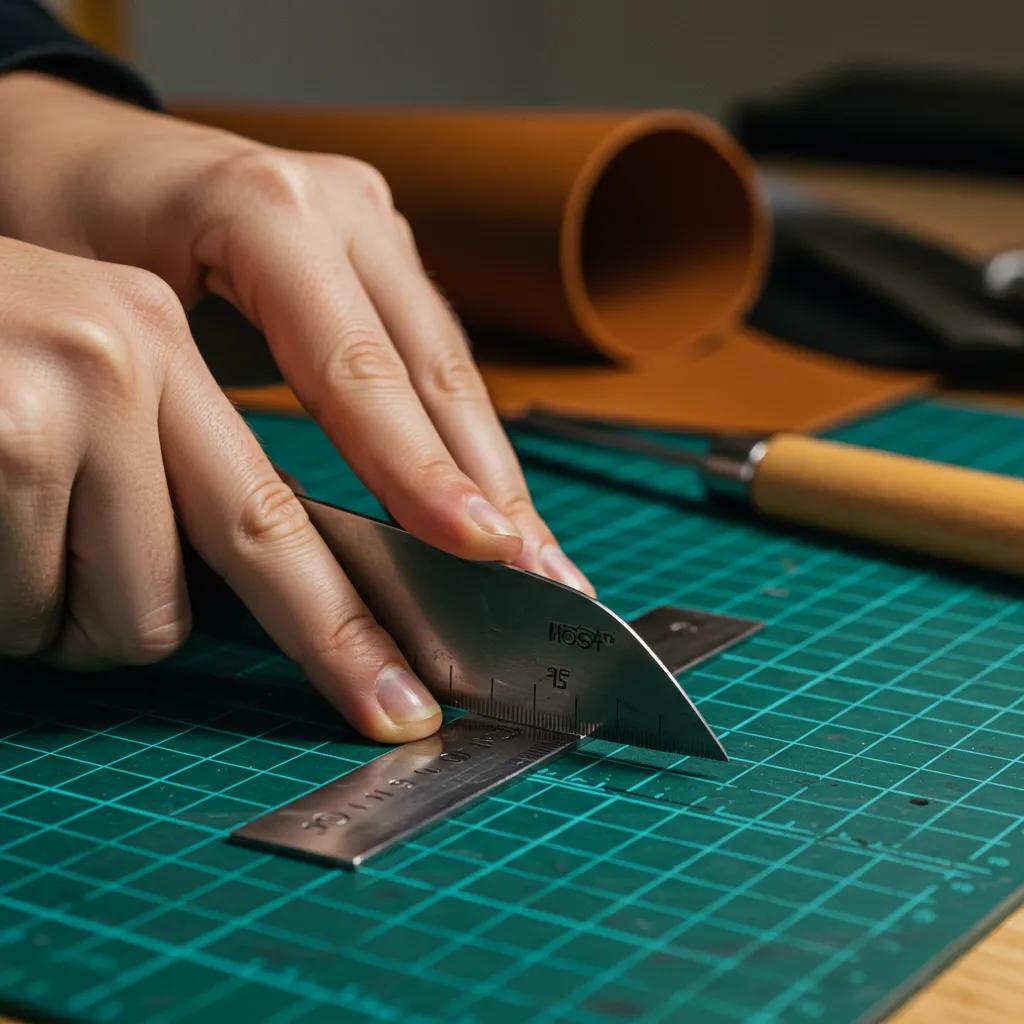
Precise cutting and careful edge finishing determine the visible quality of any leather item and how well parts fit before stitching begins. Good pattern cutting reduces rework and material waste. Start with a stable cutting mat, a reliable straightedge and a freshly sharpened leather knife to get clean edges that align when stitched. Skiving—thinning leather at seam allowances—controls bulk so layers fold smoothly; use a skiving knife or machine for consistent results. Edge beveling removes the sharp corner, then sand, apply a burnishing compound or gum tragacanth and burnish with friction to compress fibers; finish with wax or edge paint to protect the edge. Small changes—how long you burnish or how deep you skive—make big visual differences, so practice on scraps before cutting your project pieces.
Clean cuts and polished edges also make tool selection clearer, since some finishes work best with specific bevelers or burnishers. The next section outlines essential tools and budget-friendly beginner options.
Which Essential Leather Craft Tools Do Beginners Need to Get Started?
A compact set of reliable tools covers most beginner projects while remaining affordable and easy to maintain. Match tools to the leather types you plan to use to speed learning. Core categories are cutting tools (knives, mat, straightedge), marking and hole tools (pricking irons, awl), stitching gear (needles, waxed thread, stitching pony) and finishing tools (edge beveler, burnisher, sandpaper). Starter kits that include a few pricking irons, needles, waxed thread, a beveler and a basic knife let you move from keychains to wallets without a large initial investment. Routine maintenance—keeping blades sharp, cleaning burnishers and storing tools dry—extends tool life and reduces frustration.
Below is a compact comparison table to help beginners prioritize purchases.
| Tool | Purpose/Attribute | Recommended Beginner Option |
|---|---|---|
| Leather knife | Clean, controlled cutting of panels | Basic replaceable-blade craft knife |
| Diamond chisel / Pricking iron | Punch evenly spaced stitch holes | 4-6 prong handheld chisel |
| Awl | Marking, opening holes, and hand-stitch setup | Sturdy sewing awl with wooden handle |
| Needles & waxed thread | Form durable saddle stitches | Size 0-2 blunt needles, polyester waxed thread |
| Edge beveler | Remove sharp corner from edges | Small handheld beveler (entry grade) |
| Burnishing tool | Polish and seal edges | Wooden or bone burnisher with compound |
This table highlights which tools give the most value for the cost. For most beginners, prioritize a sharp cutting knife, a pricking iron and basic burnishing supplies before expanding your kit.
What Are the Must-Have Tools for Leather Stitching and Cutting?
Stitching and cutting need the right tools plus a workspace setup that supports repeatable, safe work. The most impactful pieces are a razor-sharp leather knife for clean panels, a reliable straightedge, one or two pricking irons or a diamond chisel for even hole spacing, and a stitching awl and needles for saddle stitching. A stitching pony or clamp holds pieces steady so both hands control tension and needle alignment. For cutting, a self-healing mat protects blades and helps lay out patterns accurately. Simple maintenance—regular blade replacement, drying tools after use and oiling wooden handles—keeps equipment performing and prevents common mistakes like ragged cuts or misaligned seams.
These basic tools also support finishing work, where bevelers and burnishers refine edges for the final look.
How Do Tools Like Edge Bevelers and Burnishing Tools Improve Leathercraft Quality?
Edge tools directly improve both the feel and lifespan of leather goods by reshaping and sealing exposed cuts. Beveling removes the sharp 90-degree corner so burnishing can compress fibers evenly; skip beveling and burnishing often looks uneven and bulky. Burnishing, combined with compounds like gum tragacanth, water or wax, compresses and smooths fibers to produce a darkened, moisture-resistant edge that sheds wear. Pro-grade tools give subtler, longer-lasting results, but entry-level bevelers and a hard wooden burnisher will show clear improvement after a few passes. Regular practice with the appropriate compounds yields professional-looking edges that noticeably raise perceived quality.
These finishing steps also affect leather selection—some hides respond better to burnishing and dyeing than others, which we compare next.
How Do You Choose the Best Types of Leather for Crafting Projects?
Choosing the right leather is key to predictable results: tanning method, thickness and grain determine how the material responds to tools, how long it lasts and how the finish behaves. Vegetable-tanned leather takes tooling well, develops a warm patina and is excellent for structured goods like belts and wallets. Chrome-tanned leather is softer, colorfast and suited to garments and lined accessories. Oil-tanned leather offers water resistance and a rugged character for outdoor items and utility gear. Pick leather that matches your project: mid-weight vegetable-tanned for beginner wallets, lighter chrome for trims or linings, and oil-tanned for straps or work belts. The comparison table below summarizes each type so you can select quickly and confidently.
| Leather Type | Key Attributes | Best Uses |
|---|---|---|
| Vegetable-tanned | Firm, holds tooling, develops patina | Belts, wallets, structured bags |
| Chrome-tanned | Soft, supple, colorfast | Garments, linings, soft accessories |
| Oil-tanned | Water-resistant, rugged finish | Work goods, outdoor straps, boots |
That comparison shows how tanning affects workflow and final product behavior. Choosing the right leather simplifies cutting, stitching and finishing—and leads to more satisfying beginner results.
What Are the Differences Between Vegetable Tanned, Chrome Tanned, and Oil Tanned Leather?
Vegetable-tanned leather is treated with plant-based tannins, producing firm hides that accept carving and tooling and age gracefully with a rich patina—ideal for structured pieces. Chrome-tanned leather uses chromium salts to create softer, more flexible hides that resist water-based staining and keep color consistent, which suits garments and lined items. Oil-tanned leather is impregnated with oils and waxes for a rugged, water-resistant surface that hides scratches and wears well in functional goods. Each tanning method affects how adhesives bond, how stitches behave around holes and how edges respond to burnishing, so test small samples before committing to a full project to confirm how a leather reacts to dye, glue and finishing in your workflow.
Understanding these differences helps you match a project’s functional needs with a leather’s properties—and informs the thickness and tools you should use as a beginner.
Which Leather Types Are Best for Beginner DIY Leather Projects?
Beginners do best with mid-weight, stable leathers that balance ease of cutting with forgiving stitchability. A 2–3 mm vegetable-tanned hide or a moderate-weight chrome-tanned leather produces predictable results for first projects. These hides hold patterns, allow clean saddle stitches without excessive needle bending and respond well to beveling and burnishing—so your technique improvements will be visible. Avoid extremes: very thin leather tears during hand stitching and very stiff hides resist folding and skiving. Always practice on scraps to check dye uptake, stitch hole spacing and burnishing response so you can match thread size and hole spacing to the leather’s behavior.
What Are Some Easy DIY Leather Projects for Beginners to Practice Basic Techniques?
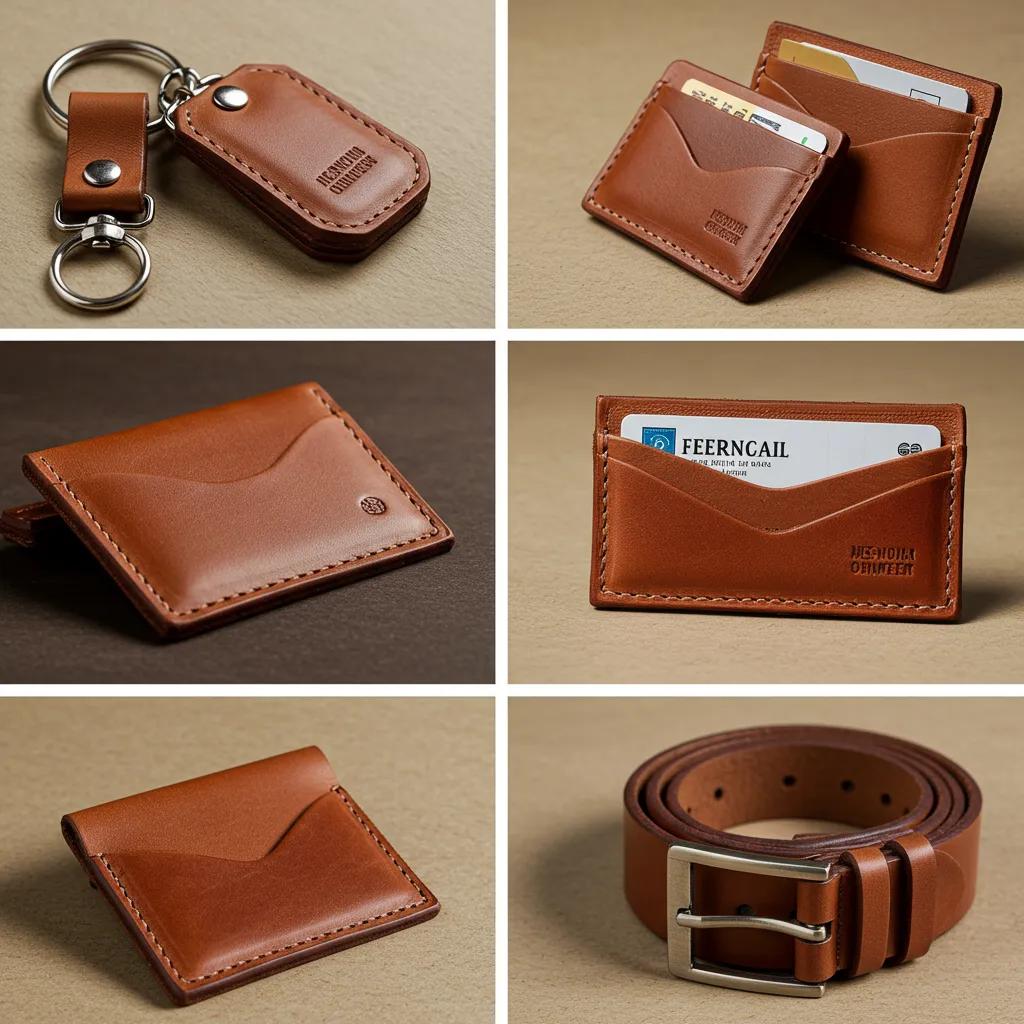
Short, focused projects let you practice single skills repeatedly while producing useful items. Pick projects that isolate cutting, stitching or edge finishing so you build muscle memory quickly. Keychains, simple card holders and belt pouches are ideal: keychains emphasize clean cutting and finishing; card holders force precise stitching and skiving; belts teach edge finishing and strength in seams. A simple materials and time estimate helps you plan one-hour or weekend sessions with measurable progress.
The table below lists starter projects, the primary skills practiced, and estimated time and difficulty so you can choose a project that targets the technique you want to improve.
| Project | Skills Practiced | Time / Difficulty |
|---|---|---|
| Keychain | Cutting, edge finishing | 30–60 min / Easy |
| Simple card holder | Cutting, saddle stitch, skiving | 1–2 hours / Moderate |
| Belt (basic) | Edge beveling, burnishing, sturdy stitching | 2–4 hours / Intermediate |
Use this project matrix to pick the right practice item for the skill you want to master—each success builds confidence quickly.
How to Make Simple Leather Wallets, Keychains, and Belts Step-by-Step
Short, repeatable sequences speed learning: plan, cut, prep edges, stitch and finish. For a basic card holder: transfer the pattern to mid-weight leather, cut panels with a sharp knife and straightedge, skive seam areas where layers overlap, punch evenly spaced holes with a pricking iron, saddle-stitch the panels and burnish edges with compound and friction; finish with a light conditioner. For a keychain: cut to size, bevel and round the edges, burnish and fit hardware—each iteration gets cleaner. For a belt: measure and cut the strap, skive the ends for the buckle, stitch or rivet as required, then bevel and burnish edges repeatedly for a polished profile. Test each step on scraps so you can adjust skiving depth, stitch spacing or burnishing pressure before committing to the final piece.
Habitual sequencing reduces rework and makes the jump to customization and dyeing more predictable and rewarding.
How Can Beginners Use Custom Stitching and Dyeing to Personalize Their Leather Goods?
Simple personalization—contrast stitching, edge dyeing and small stamps—lets beginners make distinctive pieces without advanced tools. Contrast stitching uses colored or thicker waxed thread to make seams a design feature. Edge dyeing followed by burnishing gives a crisp border. Stamping initials or a small motif into vegetable-tanned leather before dyeing produces a subtle, permanent mark—always test stamps and dyes on scrap first. Safety matters: wear gloves when using dyes and ensure good ventilation; practice thin, even dye coats to avoid blotches. These straightforward steps reward preparation and help you move from basic craft to signature pieces.
When you’re comfortable with personalization, refining dyeing and edge finishing delivers professional visual quality suitable for small collections or custom orders.
How Can You Master Leather Dyeing, Painting, and Edge Finishing for Professional Results?
Professional-looking dyeing, painting and edge finishing come from disciplined surface prep, testing and thin, layered work. Start by cleaning and deglazing the leather so dyes and paints absorb evenly; always test on a scrap to confirm color and finish. Use the right dye type—water-based for even coverage, alcohol-based for faster penetration—and apply in thin layers, letting each coat dry for depth without streaks. Edge finishing follows beveling, sanding, burnishing with compound and friction, and sealing with wax or edge paint to protect against moisture and wear. The bulleted workflow below gives a repeatable sequence beginners can practice to get consistent, shop-quality results.
- Clean and deglaze the leather surface so dyes absorb uniformly.
- Apply dye in thin, overlapping strokes; allow full drying between coats.
- Sand and bevel edges before burnishing to remove sharpness and reduce bulk.
- Burnish with compound and friction until smooth, then seal with wax or edge paint.
Follow this workflow consistently to reduce uneven color, avoid streaking and produce durable edges that stand up to handling.
What Are the Best Practices for Dyeing and Painting Leather at Home?
Uniform color and durable finishes at home need good ventilation, test swatches and patience. Rushing heavy coats usually causes streaks and uneven absorption. Clean the leather with a preparer or alcohol-based degreaser, test dye on scrap and apply with a sponge, dauber or airbrush depending on scale. Build color with thin, repeated coats and allow full drying between layers. Finish with a suitable sealant or leather topcoat—cream conditioners add flexibility, clear topcoats add abrasion resistance. Troubleshoot with light sanding for mottling or touch-ups after sealing. Careful testing and incremental adjustments are the fastest path to consistent, shop-quality dye and paint work.
Good dyeing technique supports professional edge finishing and helps your pieces look—and last—like commercial products.
How Do You Achieve Perfect Leather Edges with Burnishing and Beveling?
Perfect edges start with deliberate material removal, steady friction and a protective finish. Bevel first to remove the 90-degree edge and reduce bulk so burnishing compresses fibers evenly. After beveling, sand with fine-grit paper to remove roughness, then apply a burnishing compound (gum tragacanth, water or wax) and use a hard wooden or bone burnisher under steady pressure and motion to create heat and compress fibers. Repeat wet/dry passes and finish with a sealing wax or edge paint. Multiple light passes give a more even sheen than a single heavy pass. If gloss is uneven or fibers raise, re-sand, repeat burnishing or add a thin sealer. These final steps turn raw cuts into smooth, attractive and long-lived edges.
With reliable edge finishing and dyeing skills, you can produce pieces that rival commercially made items and make custom manufacturing choices easier when scaling production.
Why Choose Hand-Stitched Custom Leather Goods and How Does Craftsmanship Impact Quality?
Hand-stitched custom leather goods offer durability, repairability and bespoke aesthetics that mass-produced items often can’t match. Craftsmanship determines long-term value through material choices and stitch technique. Saddle stitch creates seams where each stitch stands independently, improving repairability and resistance to repeated stress—this contributes to a longer service life and higher user value. Custom manufacturing lets you adjust patterns, match Pantone colors and apply artisan oversight so small batches meet precise specifications that mass production usually cannot. Pakistan Leather’s capabilities as a manufacturer and exporter—showing hand-stitched examples and Pantone color development—demonstrate how skilled craft and production controls produce consistent, high-quality goods. If you need sample swatches or bespoke runs, Pakistan Leather accepts custom requests through its published contact channels to support both individual buyers and wholesale clients.
How Does Hand Stitching Enhance Durability and Aesthetic Appeal?
Hand stitching improves durability because each saddle stitch passes redundant thread lines through every hole, so seam integrity doesn’t rely on a single lockstitch. That redundancy resists localized failures and makes repairs straightforward. Aesthetically, hand stitching produces even, visible stitch lines that can be tuned for tension, spacing and color to complement leather patina and edge finishes. Common examples are reinforced strap anchors and wallet seams, where hand stitching prevents seam blowout and allows targeted reinforcement. If a stitch breaks, you can often replace only the affected portion rather than the whole seam—one reason hand-stitched goods are prized as heirloom-quality items and command higher perceived value.
These benefits are strongest when combined with careful material selection and finishing, which are core parts of a reliable custom manufacturing workflow.
What Makes Custom Leather Manufacturing Unique Compared to Mass Production?
Custom manufacturing stands apart by prioritizing bespoke adjustments, sample approval and tighter artisan oversight to meet specifications mass production usually can’t. The workflow emphasizes prototyping, Pantone-based color development for consistent dye across runs and hand inspection for stitch and edge quality before shipment. For wholesale buyers, that means the manufacturer can match materials and methods—selecting sheep, goat, cow or buffalo hides and adjusting stitch profiles—to the product’s use and brand look. Pakistan Leather’s exporter capabilities and direct sales model support both one-off custom pieces and larger orders with consistent quality checks, enabling buyers to request samples and color proofs before committing to production. The outcome is a predictable partnership where craft skills become repeatable product quality and clear supply-chain readiness.
These manufacturing differences matter when you scale from hobby pieces to commercial runs—the same core techniques (cutting, stitching, finishing and dyeing) must be repeatable and controllable at volume.
Frequently Asked Questions
What safety precautions should beginners take when working with leather?
Safety matters. Always cut away from your body and keep blades sharp—dull tools are more dangerous. Wear gloves when handling strong dyes, solvents or adhesives to prevent skin irritation. Work in a well-ventilated area when using products that emit fumes. Keep your bench tidy to avoid slips and accidental cuts, store tools safely out of reach of children and learn the proper disposal procedures for chemicals you use.
How can I maintain my leather tools for longevity?
Simple upkeep keeps tools working and safe. Clean tools after each use to remove leather dust and residue. Hone cutting blades regularly—sharp knives cut better and are safer. Store tools in a dry place to prevent rust and consider a light oil film on metal parts. Clean and condition wooden handles occasionally. Proper care extends tool life and makes every project smoother.
What are some common mistakes beginners make in leatherworking?
Common errors include poor measurement (leading to misfit pieces), rushing cutting or stitching (causing uneven edges and weak seams) and skipping practice on scrap leather. Another frequent issue is inadequate surface prep before dyeing, which causes patchy color. Take time to measure, practice each step on scraps and prepare surfaces before finishing—this saves time and frustration.
How do I choose the right leather thickness for my projects?
Thickness matters. For most beginners, 2–3 mm is a good starting range: it balances easy cutting and stitching with enough strength for wallets and small accessories. Thicker leather suits belts and heavy bags; thinner hides work for linings and delicate trims. Test different thicknesses on small projects to find what works best for your techniques and tools.
What are the benefits of using vegetable-tanned leather for beginners?
Vegetable-tanned leather is beginner-friendly because it’s versatile and toolable. It’s firm enough for carving and stamping, accepts dyes well and develops a pleasing patina over time. It’s also more forgiving for edge finishing and tooling practice, making it an excellent choice for learning and sustainable in many workflows.
Can I use regular paint for dyeing leather, or should I use specialized products?
Use products made for leather. Regular paint often lacks flexibility and adhesion, which can lead to cracking or peeling. Leather dyes and paints are formulated to penetrate and remain flexible with the hide. Always test any product on scrap before applying it to a finished piece.
Conclusion
Learning basic leatherworking techniques gives beginners the confidence to make durable, attractive goods while opening a rewarding creative practice. Understand the key skills and tools, practice deliberately and choose materials that match your project goals. Explore our selection of quality leathers and starter tools to elevate your work. Start small, practice consistently and turn your ideas into well-crafted pieces.


